|
First time trying one of my Tutorials? Then please check my Terms of Use before you continue
You will need: Font of your choice - I used one called Bumrush Tube of your choice - I will be using the artwork of Michael Calandra License and Tubes available at Creative Design Outlet One of my Templates SpawnsFSTemplate045
Filters: Eye Candy 6: Textures/Brushed Metal Eye Candy 6/Gradient Glow Eye Candy 6/Perspective Shadow (optional)
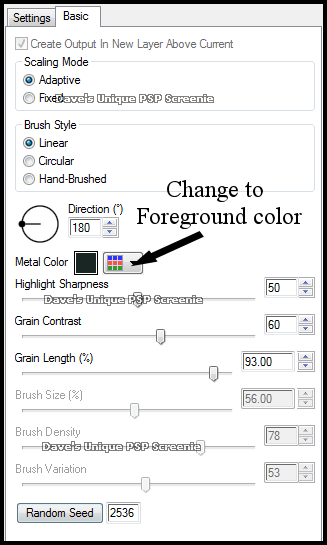
Ok let's begin Open my Template ... Window> Duplicate ... Close Original Delete the Credits and Black Line layers In your Materials Palette change your Foreground to a Dark color from your Tube and your Background to a Light from your Tube ... Activate the Grey Vertical Lines layer Effects> Eye Candy 6: Textures> Brushed Metal
Activate the Grey Horizontal Lines layer Effects> Eye Candy 6: Textures> Brushed Metal This time change the Direction to 270 and hit the Random Seed button once
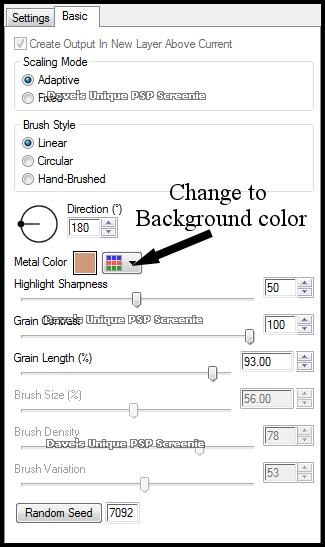
Activate the Light Grey Horizontal Lines layer Effects> Eye Candy 6: Textures> Brushed Metal
Activate the White Vertical Lines layer ... Rename this layer Ani Duplicate this layer twice (for a total of 3) Activate the Ani layer ... Effects> Eye Candy 6: Textures> Brushed Metal This time change the Direction to 270 and hit the Random Seed button once Activate the Copy of Ani layer Effects> Eye Candy 6: Textures> Brushed Metal ... Hit the Random Seed button once Activate the Copy (2) of Ani layer Effects> Eye Candy 6: Textures> Brushed Metal ... Hit the Random Seed button once Hide the 2 top Ani layers for now
Activate the Grey Vertical Lines layer In the Layer Palette move this layer to above the Copy (2) of Ani layer Effects> Eye Candy 6> Gradient Glow ... Settings ... Simple (thin) ... Black Click on the Click on the Basic tab Change the Glow Radius to a 4 and the Overall Opacity to 50
Activate the Grey Horizontal Lines layer ... Layers> Arrange> Move Up Effects> Eye Candy 6> Gradient Glow ... same settings as before
Activate the Border layer Selections>Select All ... Selections> Float ... Selections> Defloat Selections> Modify> Expand ... by 1 Layers> New Raster Layer ... Flood Fill the Selection with your Foreground color Selections> Select None ... Layers> Merge> Merge Down Adjust> Add/Remove Noise> Add Noise
Effects> Eye Candy 6> Gradient Glow ... Settings ... Simple (thin) ... White Click on the Click on the Basic tab and change the Glow Radius to 1 Paste your Tube as a New Layer ... Resize if needed and position around the middle to hide the line direction changes
Add a Drop Shadow of choice ... I chose Effects> Eye Candy 6> Perspective Shadow ... Settings ... Drop ... Height 2 In the Layer Palette move this layer below the Border layer
Add copyrights and your Name
ANIMATING
Return to PSP and unhide the Copy (2) of Ani layer ... Edit> Copy Special> Copy Merged Edit> Select All ... Animation> Frame Properties ... change to 17 And that's it. All that's left is to save your Tag ... If you wish to Preview it first View> Animation
Tutorial written on the 26/12/2016 ©David Hanslip |