|
First time trying one of my Tutorials? Then please check my Terms of Use before you continue You will need: Font of your choice - I used one called Barbed Ink Tube of your choice - I will be using the artwork of Elias Chatzoudis License and Tubes now available at Creative Design Outlet One of my Templates SpawnsFSTemplate002
Filters: DSB Flux/Bright Noise Eye Candy 6/Gradient Glow xero/Fritillary Eye Candy 6/Perspective Shadow (optional)
Ok let's begin Open my Template ... Window> Duplicate ... Close Original ... Delete the Credits layer Activate the Left - Angled Line layer ... Layers> Merge> Merge Down Selections>Select All ... Selections> Float Selections> Defloat ... Delete the Right - Angled Line layer ... Layers> New Raster Layer Flood Fill the Selection with a dark color from your Tube Selections> Select None ... Effects> DSB Flux> Bright Noise
Effects> Eye Candy 6> Gradient Glow ... Settings ... Simple (thin) ... White Rename this layer A Line Activate the Top/Bottom Half Rectangle layer ... Layers> Merge> Merge Down Selections>Select All ... Selections> Float ... Selections> Defloat Layers> New Raster Layer ... Flood Fill the Selection with a medium color from your Tube Effects> DSB Flux> Bright Noise ... same settings as before
Selections> Select None ... Change this layers Blend Mode to Multiply Layers> Merge> Merge Down Effects> Eye Candy 6> Gradient Glow ... same settings as before Rename this layer Cross
Activate the Bottom Left - Background layer ... Selections> Select All ... Selections> Float Selections> Defloat ... Flood Fill the Selection with a color from your Tube Paste your Tube as a New Layer Move into position so what you want to keep is inside the selection Selections> Invert ... Edit> Clear ... Selections> Select None Change the layers Blend Mode to Luminance or Luminance (L) Layers> Merge> Merge Down ... Rename this layer BLB
Activate the Top Right - Background layer ... Repeat the steps above in red Rename this layer TRB Activate the Bottom Right - Background layer ... Layers> Merge> Merge Down Selections> Select All ... Selections> Float ... Selections> Defloat Flood Fill the Selections with a light color from your Tube
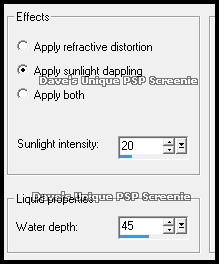
Effects> xero> Fritillary... with the following settings
Selections> Select None ... Rename this layer FRIT
Activate the Left - Lines Strip layer ... Layers> Merge> Merge Down Effects> DSB Flux> Bright Noise ... same settings as before Effects> Eye Candy 6> Gradient Glow ... Settings ... Simple (thin) ... Black Click on the Basic tab and change the Glow Radius to 1 Rename this layer WL
Activate the Left - Mini Squares layer ... Layers> Merge> Merge Down Change this layers Blend Mode to Overlay ... Rename this layer Squares Move this layer so it is above the TRB layer
Activate the Background - Middle layer Selections> Select All ... Selections> Float ... Selections> Defloat
Paste your Tube as a New Layer Move into position so what you want to keep is inside the selection Selections> Invert ... Edit> Clear ... Selections> Select None Change the layers Blend Mode to Luminance or Luminance (L) Rename this layer CU
Activate the Frame layer Selections> Select All ... Selections> Modify> Contract by 2 Layers> New Raster Layer Flood Fill the Selection with the first color you used from your Tube Selections> Modify> Contract by 2 ... Edit> Clear ... Selections> Select None Layers> Merge> Merge Down Effects> DSB Flux> Bright Noise ... same settings as before
Paste your Tube as a New Layer ... Resize if needed and move a little to the left Effects> Eye Candy 6> Perspective Shadow ... Settings ... Drop ... Blurry Move this layer below the Frame layer
Add Copyrights and your Name ... Hide ALL layers apart from CU and Background - Middle
ANIMATING
Click on the Customize button
Change the first 10 waves to the following Wave 1: X 0 ... Y -56 Wave 2: X 10 ... Y 42 Wave 3: X -43 ... Y -56 Wave 4: X 35 ... Y -51 Wave 5: X 24 ... Y -54 Wave 6: X 36 ... Y 0 Wave 7: X -37 ... Y 35 Wave 8: X -9 ... Y 56 Wave 9: X -28 ... Y -12 Wave 10: X 36 ... Y 26
Set all other waves to X 0 ... Y 0 Click on OK then on OK again ... DELETE the last Frame This is your Animation ... Minimize for the moment
Return to PSP hide the CU layer and unhide the following layers Squares ... TRB .. FRIT .. BLB
Edit> Copy Special> Copy Merged ... Go back to Animation Shop Hold down CTRL and keep pressing L until you have 10 frames
Activate the image with Background Frames ... Edit> Select All Edit> Paste> Into Selected Frames ... move into position and click once This is now the Animation with Background Frames
Return to PSP hide the TRB .. FRIT .. BLB and Background - Middle layers and unhide the WL layer and all layers above Edit> Copy Special> Copy Merged ... Go back to Animation Shop Edit> Paste> As New Animation ... Edit> Copy Hold down CTRL and keep pressing L until you have 10 frames Edit> Select All ... Edit Copy
Activate the Animation with Background Frames ... Edit> Select All Edit> Paste> Into Selected Frames ... move into position and click once
Here is another example ... I changed the squares Blend Mode to Burn on this one
Tutorial written on 24/12/16 ©David Hanslip |


